This script will provide a link to the top of the page as means to get back to the main navigation. In other words, this allows users to go back the main navigation from almost every scrolling position. It may also be convenient for disabled users who scrolling is difficult to do.
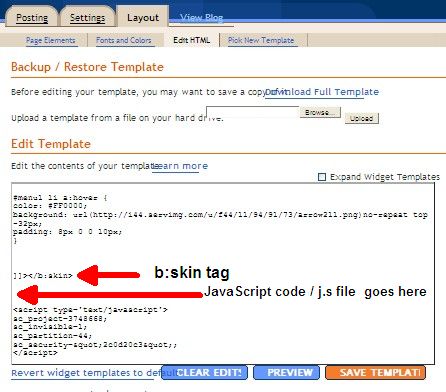
Login to your Dashboard> Layout> Edit Html. Next, copy the script source code below and paste between the closing b:skin tag and the closing head tag.<script src='http://javascripthost.com/s1/bin/jumptop.js'/>
That's all for now. Save the template and you're done!
Showing posts with label JavaScript. Show all posts
Showing posts with label JavaScript. Show all posts
To The Top Link
Total Posts And Comments
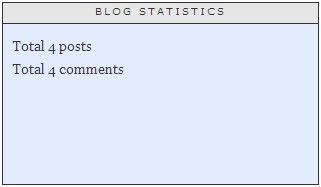
This script will add a total number of posts and comments to your blog. After you install this script, you will get to see your total number of posts and comments since you started blogging.
To install this script, login to your Dashboard> Layout> Add A Gadget (preferably with a sidebar). Copy and paste the code below.Total <script style=""> function showpostcount(json) { document.write(parseInt(json.feed.openSearch$totalResults.$t,10)); }</script><script src="/feeds/posts/summary?max-results=0&alt=json-in-script&callback=showpostcount"></script> posts <br>
Total <script src="/feeds/comments/summary?max-results=0&alt=json-in-script&callback=showpostcount"></script> comments
That's all it takes to install and save your work.
Creating Image Reflections
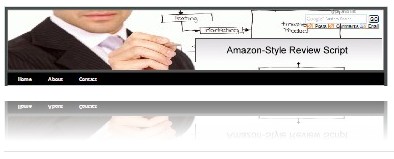
What if a person like me who has a little knowledge about Photoshop but wanted to create image reflections? I too can be making reflections with the best of them and I'll show you how.
Login to your Dashboard> Layout> Edit Html. Next, copy the script source code below and paste between the closing b:skin tag and the closing head tag.
<script src='http://onlinebiztutorials.googlepages.com/reflection.js' type='text/javascript'/>Save the template. Then, click Settings> Formatting> Post Template. Add this line into the post template box.
<img src="URL of image" class="reflect">Example:
<img src="http://i74.servimg.com/u/f74/11/94/91/73/screen13.jpg" class="reflect">Save settings. You'll notice that anything you type into the box of "Post Template" will appear in your new post. That's it for today. Enjoy :wink:
How To Make A Pie Chart?
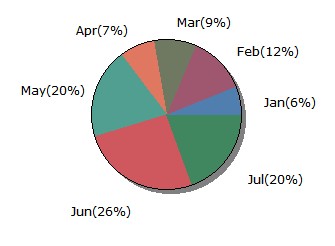
To make this possible, you must have the point data and my point data I used to do a graph is shown below:-

<script src='http://onlinebiztutorials.googlepages.com/wz_jsgraphics.js' type='text/javascript'/>
<script src='http://onlinebiztutorials.googlepages.com/pie.js' type='text/javascript'/>
Save the template. Now moving forward on your post editor which is under Edit Html mode. Copy and paste this script into your post editor as shown below:-
<div id="pieCanvas" style="overflow: auto; position:relative;height:350px;width:380px;"></div>

<script type="text/javascript">
var p = new pie();
p.add("Jan",100);
p.add("Feb",200);
p.add("Mar",150);
p.add("Apr",120);
p.add("May",315);
p.add("Jun",415);
p.add("Jul",315);
p.render("pieCanvas", "Pie Graph")

</script>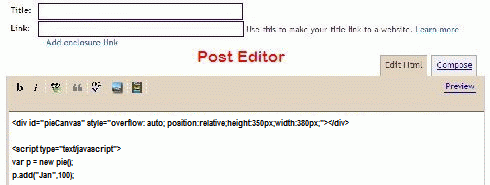
Plotting a Line Graph

This is a purely DHTML/CSS based Line Graph Script, very simple to follow and it gets the job done, although I must say that it's not as efficient as other methods such as Multiple Line Chart, Bar Graph and Pie Chart. However, if you're a beginner, this will plot data and quickly.
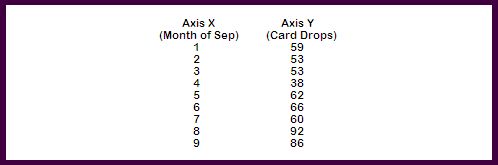
The following guide lines are provided for you to follow in making a Line Graph. Before that, you must have the point data in order for you to be able to plot on a graph. Here is my point data I used to do a graph as shown below:-
Login to your Dashboard> Layout> Edit Html. Check the Expand Widget Template check box. Copy the scripts source code below and paste between the closing b:skin tag and the closing head tag.<script src='http://onlinebiztutorials.googlepages.com/wz_jsgraphics.js' type='text/javascript'/>
<script src='http://onlinebiztutorials.googlepages.com/line.js' type='text/javascript'/>
Save the template. Now, let's go to your post editor which is under Edit Html mode. Copy and paste this script into your post editor as shown below:-<div id="lineCanvas" style="overflow: auto; position:relative;height:300px;width:400px;">
<script type="text/javascript">var g = new line_graph();g.add('1', 59);g.add('2', 53);g.add('3', 53);g.add('4', 38);g.add('5', 62);g.add('6', 66);g.add('7', 60);g.add('8', 92);g.add('9', 86);g.render("lineCanvas", "Month of Sep");</script>
</div>
Make your post below or above the script and don't forget to click on "Publish Post" button to complete the entry. That's it. Enjoy! (Note - red represents the Horizontal Axis while blue indicates the Vertical Axis.)

Widget Installers Part 1
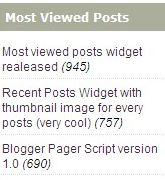
For those using Blogger as their blog platform, I've made things easier for you to add "Most Commented" widget, "Top Commenters" widget and "Most Viewed Posts" widget on your blog. Now, anyone else can use this widget installers to easily add widgets to their blog with the click of a button. Normally, we would just take the badge code and put it in an HTML/Javascript widget on our own blog and we'd be done. However, here I decided to help out other people who might want to do the same thing.
(Click image to enlarge)
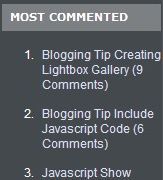 | 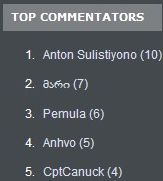 |  |
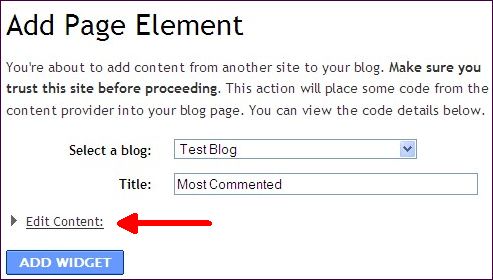
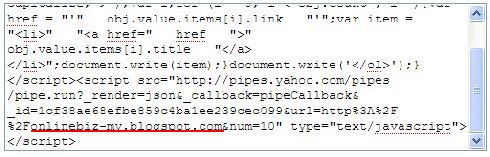
For "Most Commented" widget and "Top Commenters" widget, these widgets require some work to utilise it’s full potential. You need to replace your own blog url after being clicked once as shown below:-
That's it, leave comments if you still need assistance. Enjoy!
Creating Text Sizer Buttons

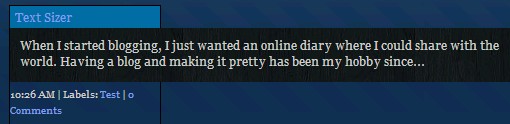
The above picture shows the increase and decrease font size buttons and the buttons are located on your sidebar. Let's learn how to make text sizer buttons. Login to your Dashboard> Layout> Edit Html. Copy and paste the following code before the closing head tag.<script type="text/javascript" src="http://onlinebiztutorials.googlepages.com/textsizer.js"></script>Next, go to Layout> Page Elements and add a new HTML/Javascript element with the following:-<center><a href="javascript:ts('body',1)"><img src="http://i34.servimg.com/u/f34/11/94/91/73/larger10.jpg"/></a><br/>
<a href="javascript:ts('body',-1)"><img src="http://i34.servimg.com/u/f34/11/94/91/73/smalle10.jpg"/></a></center>
Save changes. That's it!
JavaScript : Recent comments using JSON
This script is something, I personally have started using quite extensively about 5 months ago. As I discussed in my previous article, I now appreciate it more than before. This guide will introduce you to JSON and explain how to use JSON with your recent comments.
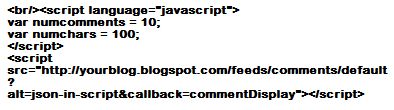
Login to your Dashboard> Layout> Edit Html. Place this code right between the closing b:skin tag and the closing head tag.
Click here to copy the code.
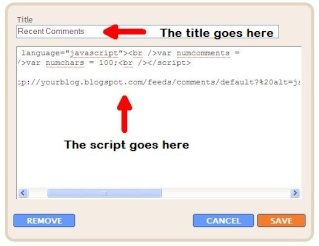
Save the settings and click on Page Elements. Choose to add Html/Javascript, and place the below code into it.
Again, click here to copy the above code.
Note - You need to change the blog URL to yours. You may also change the number of comments and the characters per comment to whatever fits your blog. By default, Blogger only allows you to show up to 25 recent comments.

JavaScript : Recent posts/articles using JSON
One of the obvious JSON advantages is that it can be directly evaluated in JavaScript. JSON (Java Script Object Notation) is another data exchangeable format like XML, but it is more lightweight,easily readable and fast data transfered/loaded. It is based on a subset of Javascript language. Therefore, Javascript can understand JSON. To sump it all, it is much better than using RSS feed for your recent posts. This guide will explain how it can be done.
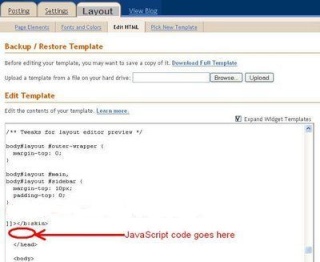
Login to your Dashboard> Layout> Edit Html. Place this code right between the closing b:skin tag and the closing head tag.
Click here to copy the code.
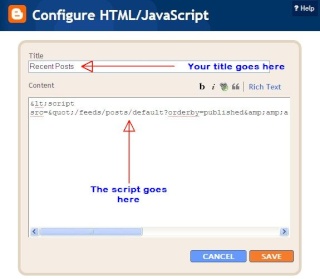
Save the settings and click on Page Elements. Choose to add Html/Javascript, and place the below code into it.<script src="/feeds/posts/default?orderby=published&alt=json-in-script&callback=rp"></script>
Click here to copy.
Note - You may change the number of recent posts to a maximum of 25. Also, the number of characters to any value as you wish.
JavaScript : Recent posts with images horizontally
The request goes like this:-

hi, I like this widget but I want it to have only images and to be horizontal not vertical. I want to be able to put this script in footer.
As to fulfill the request, this widget is a form of photo sharing and publishing on your blog provided in each of your blog posts, there's at least one photo submitted, if you fail to do so, the default images will be shown. A display link of the respective page title will appear on when you hover over an image.
Copy and paste the following script into your html/javascript and save the changes.
<script type="text/javascript">
imgr = new Array();
imgr[0] = "http://vietwebguide.googlepages.com/LDP08-06-11-01.png";
imgr[1] = "http://vietwebguide.googlepages.com/LDP08-06-11-02.png";
imgr[2] = "http://vietwebguide.googlepages.com/LDP08-06-11-03.png";
imgr[3] = "http://vietwebguide.googlepages.com/LDP08-06-11-04.png";
imgr[4] = "http://vietwebguide.googlepages.com/LDP08-06-11-05.png";
imgr[5] = "http://vietwebguide.googlepages.com/LDP08-06-11-06.png";
imgr[6] = "http://vietwebguide.googlepages.com/LDP08-06-11-07.png";
imgr[7] = "http://vietwebguide.googlepages.com/LDP08-06-11-08.png";
imgr[8] = "http://vietwebguide.googlepages.com/LDP08-06-11-09.png";
imgr[9] = "http://vietwebguide.googlepages.com/LDP08-06-11-10.png";

max_rc_post = 7;
</script>
<script src="http://onbizmy.googlepages.com/rcpost-thumb-horiz-v11.js"></script>

<script type="text/javascript" src="http://www.blogger.com/feeds/
6215370811350331379/posts/default?max-results=7&alt=json-in-script&callback=showrecentposts"></script>

<div id="wg-rc-img-desc"></div>
Note - Replace the blog ID to yours as shown in blue color and you may also change the number of images to fit the size of your footer/header. For this widget, you can't set width or height on images as they are set to display inline.(125x125) unless you know how to retrieve the js.file and host it back again. With a little bit of creativity, you may also display your friend's photoblog on your site provided he/she is using the blogspot domain. Last but not least, special thanks to Anhvo for making the day. Opsss... if you find this widget is interesting, please spread the word.
JavaScript : A scrolling recent posts
Lately I've been telling my readers about something I think is great. If you're looking for something different, here is a new widget for your recent posts. This widget is a scrolling piece of text displayed either horizontally across or vertically down your web site page depending on the settings. Let me show you the ways.
1- Login to your Dashboard> Layout> Page Elements
2- Click on Add a Page Element
3- Chose Add Html/JavaScript.
4- Copy and paste the below script.<div style="border:1px #EEDDDD dashed; width:484px;">
<style type="text/css">
.sliderecent{
color:#009900;
font-size:14px;
font-weight:bold;
margin-top:5px;
margin-left:5px;
display:block;
font-family:Verdana, Arial, Helvetica, sans-serif;
}
.slidecontent {
color:#003399;
font-size:12px;
margin:5px;
font-family:Verdana, Arial, Helvetica, sans-serif;
}
</style>
<script type="text/javascript">
var scrollerwidth='450px';
var scrollerheight='120px';
var pausetime=5000;
feedlink = "http://feeds.feedburner.com/blogspot/Rtvu";
maxpost = 5;
icon = " » ";
</script>
<div id="baimoi2x" style="display:none; visibility:hidden; width:0px; height:0px;">
<script type="text/javascript" src="http://vietwebguide.googlepages.com/sliderecent00.js"></script>
</div>
<script type="text/javascript" src="http://vietwebguide.googlepages.com/sliderecent01.js"></script>
<ilayer id="sl_main" width=&{scrollerwidth}; height=&{scrollerheight}; visibility=hide>
<layer id="sl_first" left=0 top=1 width=&{scrollerwidth};>
<script type="text/javascript" src="http://vietwebguide.googlepages.com/sliderecent02.js"></script>
</layer>
<layer id="second" left=0 top=0 width=&{scrollerwidth}; visibility=hide>
<script type="text/javascript" src="http://vietwebguide.googlepages.com/sliderecent03.js"></script>
</layer>
</ilayer>
<script type="text/javascript" src="http://vietwebguide.googlepages.com/sliderecent04.js"></script>
</div>
5- Save changes and you're done with it.
Note - You may change the colored portion to whatever you want it to be.
This widget is brought to you by Anhvo of Vietwebguide.com
JavaScript : Total number of online users
This script displays the total number of online users, users since the webblog began, and hits since the webblog began. It is completely flatfile based so no SQL required.
Easy to install into your sidebar widget. Here are the steps as follow:-
1- Login to your Dashboard> Layout> Page Elements
2- Click on Add a Page Element
3- Chose Add Html/JavaScript.
4- Copy and paste the below script.<script type="text/javascript">
most_users_online = "Most users ever online was";
at2 = "as at";
home2 = location.href.split("/")[2] ;
</script><script src="http://onlinebiztutorials.googlepages.com/most-users-online.js" type="text/javascript"></script>
5- Save changes and you're done.
Note - You may change the colored portion to your own text.
The end result is shown below:-Most users ever online was 10 as at 11:10:48 AM Thursday 12th June 2008
This widget is brought to you by Anhvo of Vietwebguide.com
Javascript : Show online users
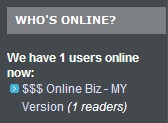
This script will let you know how many visitors you currently have on your blog with detailed statistic of what they are reading. Again, this script is brought to you by Anvho of vietwebguide.com
Easy to install. Just copy and paste the below script into your sidebar widget.<style type="text/css">.readingtopics_text {font-weight:bold}</style>
<script type="text/javascript">
reader_text = "readers";
</script>
<script type="text/javascript" src="http://onlinebiztutorials.googlepages.com/reading-num.js"></script>
In case the bandwidth for this js file has been exceeded, click here to copy the code and host onto your own Google Page.
Happy blogging.
JavaScript : Most viewed posts

For this reason, I'll help Avnho to publish his hack on my site. Here are the details of how to install the widget on your sidebar.
1- Login to your Dashboard> Layout> Page Elements
2- Chose to add Html/Javascript.
3- Copy and paste the following code:-<script type="text/javascript">
start_views_num = 500;
limit = 7;
</script>
<script src="http://onlinebiztutorials.googlepages.com/topviews222.js" type="text/javascript"></script>
5- Save changes.
Configuring the script:-
You may change the start views number as you wish.
You may also alter the limit of the post title to any number.
JavaScript : Recent Posts and associated images
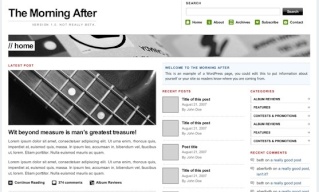
The search for the widget was successful and I landed on a blog site of VietWebguide.com where I found the info about the widget. The steps provided below for customising various aspects of the widget applies as follows:-
1- Login to your Dashboard> Layouts> Page Elements>
2- Click on 'Add a Page Element' which is under your sidebar.
3- Chose to add Html/Javascript.
4- Copy and paste the following code:- <script type="text/javascript">
imgr = new Array();
imgr[0] = "http://anhvo.info.googlepages.com/phi00001.png";
imgr[1] = "http://anhvo.info.googlepages.com/phi00002.png";
imgr[2] = "http://anhvo.info.googlepages.com/phi00003.png";
imgr[3] = "http://anhvo.info.googlepages.com/phi00004.png";
imgr[4] = "http://anhvo.info.googlepages.com/phi00005.jpg";
imgr[5] = "http://anhvo.info.googlepages.com/phi00006.jpg";
imgr[6] = "http://anhvo.info.googlepages.com/phi00007.jpg";
tablewidth = 180; cellspacing = 1; bgColor = "#ABAE9B"; imgwidth = 45; imgheight = 45;
icon = "•";
numposts = 10;
home_page = "http://en.vietwebguide.com/";
</script>
<script src="http://onlinebiztutorials.googlepages.com/recentpost2.js" type="text/javascript"></script>
5- Save changes.
Note -
The red color indicates you may specify/change/edit to your needs.
The green color is meant for the default images.
The blue color is for you to change to your own url.
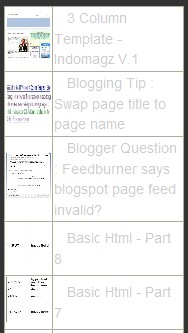
The ‘Recent Posts’ area on the main page displays the next 10 (by default) latest posts (after the very latest one, in descending order). The end result is shown below:-
Recent Posts
JavaScript : Most Popular Articles
This script is totally based on number of commentators put up their comments on your site. The more they continue to comment, the higher the post ranking, thus making the article on top of the list.
Here we go, just follow this few simple steps as below:-
1- Go to Dashboard> Layout> Page Elements
2- Click on Add a page element of your sidebar.
3- Chose for Edit Html/Javascript to add (copy and paste) the below script into your sidebar.
Click here to get the script.
4- Don't forget to change it to your blog name.
5- Place your own title i.e Most Popular Articles
6- Save.

JavaScript : Entrecard last droppers display widget
Some of the forumners commented on my previous Entrecard widget, they said that the widget was actually very ugly. I have to agree with a lot of them.(see picture on top left side)
But then, with help from Google Ajax, I managed to come out with a new Entrecard last droppers display widget and its still letting me to display the content of my Entrecard inbox, which means the name, link and the description of visitors who have dropped Entrecards on my site.
The below mentioned steps can only be used to any blogspot domain.
1- Go to Dashboard> Layout> Page Elements
2- Click on Add a Page Element of your sidebar.
3- Chose for Html/Javascript as an option to add to blog.
4- Put a title of your own choice i.e Last Droppers
5- Copy and paste the following code:-<!-- Begin -->
<!--
// Created with a Google AJAX: OnlineBiz-MY
// All rights reserved 2008.
// This credit must be included in all your derived usages.
// http://onlinebiz-my.blogspot.com
-->
<div id="feed-control">
<span style="color:#676767;font-size:11px;margin:10px;
padding:4px;">Loading...</span>
</div>
<!-- Google Ajax Api
-->
<script src="http://www.google.com/jsapi?key=ABQIAAAAp07
rQAkZMd9XHgmea1WKLxRt4LW8kAHk_mn-4M_ZQVzMx8OWHBRoSFNz
668Hmlf5Z117QoUrQ7J7Qw"
type="text/javascript"></script>
<!-- Dynamic Feed Control and Stylesheet -->
<script src="http://www.google.com/uds/solutions/dynamicfeed/
gfdynamicfeedcontrol.js"
type="text/javascript"></script>
<style type="text/css">
@import url("http://www.google.com/uds/solutions/dynamicfeed/
gfdynamicfeedcontrol.css");
</style>
<script type="text/javascript">
function LoadDynamicFeedControl() {
var feeds = [
{title: 'Blog Preview',
url: 'http://entrecard.com/feeds/inbox/X6YTKG2GMB/rss2.0'
}];
var options = {
stacked : false,
vertical : true,
title : ""
}
new GFdynamicFeedControl(feeds, 'feed-control', options);
}
// Load the feeds API and set the onload callback.
google.load('feeds', '1');
google.setOnLoadCallback(LoadDynamicFeedControl);
</script>
<!-- End -->
6- Change the colored portion to your RSS url. To find your RSS url, login to your Entrecard account, click on dashboard, hover the cursor over the RSS icon to the right of the images of recent entrecards dropped on your site and you’ll read the complete link to your inbox feed on your browser’s status bar. It should be something like above.(in red color)
5- Save.

JavaScript : Top Commenters
Here's some JavaScript code that uses Yahoo's JSON output. You may add to your Html/JavaScript under your "Add a Page Element" into your sidebar. The result is shown below:-


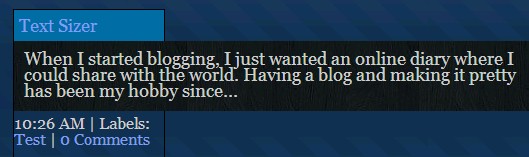
The above script has 3 parameters:-
* url = your blog's address
* num = the number of people from the list
* filter = a name you can filter from the list
To filter the author from being listed as one of the commenters, please filter it out as follows:-
num=10&filter=Author's Name"
Enjoy!
* url = your blog's address
* num = the number of people from the list
* filter = a name you can filter from the list
To filter the author from being listed as one of the commenters, please filter it out as follows:-
num=10&filter=Author's Name"
Enjoy!
Javascript - Matikan Fungsi Kanan Tetikus
Salin dan tempek skrip isi kandungan skrip di bawah ini dan masukkan ke dalam BODY laman web/blog anda. Bagi pengguna Blogger, sila ke Layout > Page Element > Add A Page Element > Add Html/JavaScript > Edit Html > Copy & Paste > Save Changes
Javascript - Elak Isi Kandungan Dari Disalin
Sebenarnya tiada skrip yang dapat menghalang atau melindungi sepenuhnya isi kandungan sesebuah laman web/blog dari disalin dan seterusnya diciplak. Skrip mudah ini yang disediakan setidak-tidaknya dapat menghalang niat pengguna baru internet.
Salin dan tempek skrip isi kandungan skrip di bawah ini dan masukkan ke dalam BODY laman web/blog anda. Bagi pengguna Blogger, sila ke Layout > Page Element > Add A Page Element > Add Html/JavaScript > Edit Html > Copy & Paste > Save Changes
Salin dan tempek skrip isi kandungan skrip di bawah ini dan masukkan ke dalam BODY laman web/blog anda. Bagi pengguna Blogger, sila ke Layout > Page Element > Add A Page Element > Add Html/JavaScript > Edit Html > Copy & Paste > Save Changes
Subscribe to:
Posts (Atom)