Showing posts with label Ajax. Show all posts

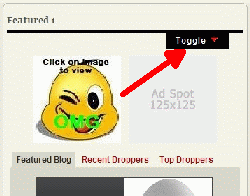
One Click Toggle


In this tutorial, we will create functions to slide DIVs up and down (Live Demo). It supports multiple animations happening simultaneously, as well as a variable animation length. And thus customize the animation speed (or to disable it entirely).

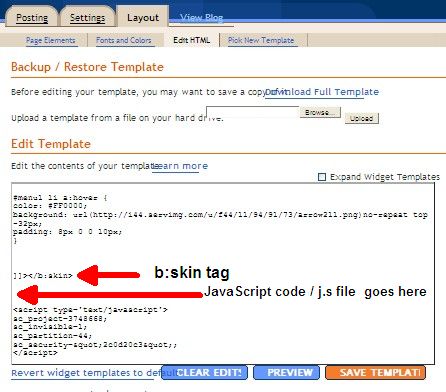
Login to your Dashboard> Layout> Edit Html. Copy and paste the code below before the closing b:skin tag

.ddpanel .ddpanelcontent{ /*CSS for "content" DIV of Drop Down Panel*/
color: white;
background: black; /*background of Drop Down Panel*/
/*Do NOT add any "padding" or "margin" properties here! Any padding/margin should be added to your content's container within this DIV instead */
}

.ddpanel .ddpaneltab{ /*CSS for "toggle" tab DIV of Drop Down Panel*/
margin-right: 20px;
font: normal 12px Arial;
}

.ddpanel .ddpaneltab a{ /*"toggle" tab related CSS*/
float: right;
color: white;
background: black url(toggleleft.gif) no-repeat left bottom; /*background of toggle tab*/
text-decoration: none;
letter-spacing: 1px;
}

.ddpanel .ddpaneltab a span{ /*"toggle" tab related CSS*/
float: left;
display: block;
background: transparent url(toggleright.gif) no-repeat right bottom;
padding: 1px 12px 4px 13px;
cursor: pointer;
}

.ddpanel .ddpaneltab a span img.pointerimage{ /*CSS for pointer image within toggle tab*/
margin-top: 2px;
margin-left: 5px;
}

.ddpanel .ddpaneltab a:hover{ /*"toggle" tab related CSS*/
background-color: navy; /*background of toggle tab onMouseover*/
}

.ddpanel .ddpaneltab a:active, .ddpanel .ddpaneltab a:focus{ /*"toggle" tab related CSS*/
outline: 0;
}

.ddpanel .ddpaneltab a:hover span{ /*"toggle" tab related CSS*/
background-color: transparent;
}

Next, add the source code below between the b:skin tag and the closing head tag. Now that page of your site has sliding abilities!
<script src='http://onlinebiztutorials.googlepages.com/dddropdownpanel.js'/>

Save the template. Then, click Page Elements> Add a Gadget (sidebar, header or footer -your choice)> Html/Javascript. Add these lines into the box.
<div id="mypanel" class="ddpanel">
<div id="mypanelcontent" class="ddpanelcontent">

<p style="padding:10px">
<img src="http://i36.tinypic.com/kak1t0.jpg" class="closepanel" style="float:left; width:200px; height:172px; margin:0 10px 10px 0" />The Milky Way is a barred spiral galaxy that is part of the Local Group of galaxies. Although the Milky Way is one of billions of galaxies in the observable universe,[4] its special significance to humanity is that it is the home galaxy of our Solar System. The plane of the Milky Way galaxy is visible from Earth as a band of light in the night sky, and it is the appearance of this band of light which has inspired the name for our galaxy. It is extremely difficult to define the age at which the Milky Way formed, but the age of the oldest star in the Galaxy yet discovered, HE 1523-0901, is estimated to be about 13.2 billion years, nearly as old as the Universe itself. -Source: <a href="http://en.wikipedia.org/wiki/Milky_way" style="color:white">Wikipedia</a>.
</p>
<br style="clear: left" />
<p>Note: Click on any link or the Milky Way Image auto closes the panel.</p>

</div>
<div id="mypaneltab" class="ddpaneltab">
<a href="#"><span>Toggle</span></a>
</div>

</div>


Save settings. Hope this helps! When defining the content to be shown inside the box, try and add explicit width/height attributes to images and other embedded elements that may affect the height of the content when they are done loading as shown above.
Read more...

Tab Content Script


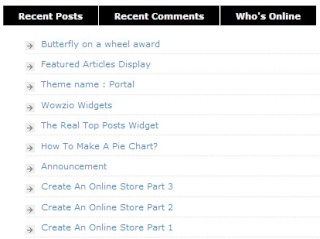
For today's tutorial, I'll show you how to display your recent comments,posts and your online users, thus lets you organize regular DIV contents on the page into a tab interface, with the desired content appearing when a tab is clicked on. The tabs are simply list based links, and the tab contents are regular DIV contents on the page or can simply be links to other pages.

Login to your Dashboard> Layout> Edit Html. Check the Expand Widget Template check box. Copy here and paste before the closing b:skin tag

Next, add the source code below between the b:skin tag and the closing head tag.
<script src='http://onlinebiztutorials.googlepages.com/vt-tabcontent.js'/>

I'd like to display on my right sidebar. So, I need to search for the right Html that governed my right sidebar. It may name differently in your template but the principle is still the same. In my case, an example is shown below:-

<div id='sidebar-wrapper'>

Finally, simply add the below HTML right after the opening div.

<!-- ^^^^^^^^^^^^^^ tabbed content ^^^^^^^^^^^^^^ -->
<ul class='tabs' id='tabs'>
<li><a class='selected' href='#' rel='tab1'>Recent Posts</a></li>
<li><a href='#' rel='tab2'>Recent Comments</a></li>
<li><a href='#' rel='tab3'>Who&#39;s Online</a></li>

</ul>
<div style='clear:both'/>
<div class='tabcontent' id='tab1'>

<!-- recent posts code start -->
&lt;script language=&quot;JavaScript&quot; src=&quot;http://feed2js.org//feed2js.php?src=http%3A%2F%2Fonlinebiz-my.blogspot.com%2Ffeeds%2Fposts%2Fdefault&amp;amp;num=10&amp;amp;tz= 8&amp;amp;targ=y&quot; type=&quot;text/javascript&quot;&gt;&lt;/script&gt;
<!-- recent posts code end -->

</div>

<div class='tabcontent' id='tab2'>


<!-- recent comments code start -->
&lt;script language=&quot;JavaScript&quot; src=&quot;http://feed2js.org//feed2js.php?src=http%3A%2F%2Fonlinebiz-my.blogspot.com%2Ffeeds%2Fcomments%2Fdefault&amp;amp;num=10&amp;amp;tz= 8&amp;amp;targ=y&quot; type=&quot;text/javascript&quot;&gt;&lt;/script&gt;
<!-- recent comments code end -->

</div>

<div class='tabcontent' id='tab3'>

&lt;style type=&quot;text/css&quot;&gt;.readingtopics_text {font-weight:bold}&lt;/style&gt;
&lt;script type=&quot;text/javascript&quot;&gt;
reader_text = &quot;readers&quot;;
&lt;/script&gt;
&lt;script type=&quot;text/javascript&quot; src=&quot;http://anhvo.info.googlepages.com/reading-num.js&quot;&gt;&lt;/script&gt;
</div>

<script type='text/javascript'>
var countries=new ddtabcontent(&quot;tabs&quot;)
countries.setpersist(false)
countries.setselectedClassTarget(&quot;link&quot;)
countries.init()
</script>
<!-- ^^^^^^^^^^^^^^ tabbed content ^^^^^^^^^^^^^^ -->


The above HTML contains 3 tab demos similar to what you see above. You're done with installation but you need to replace with your blog's url. Also, you need to specify your own container's width as the above example is having 420 pixels wide.

Read more...

Featured Articles Display


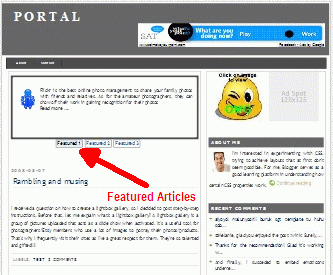
If you want to draw attention to a few particular articles. And also want to display on the front page, then you are really going to like this script which just happens to be a perfect addition to any Blogspot template to display a gallery of featured articles. The featured articles can be retrieved from an external file on your server via Ajax but for today's tutorial, I'll only show you how to turn your ordinary Html content into an interactive content display.

Login to your Dashboard> Layout> Edit Html. Check the Expand Widget Templates check box. Copy here and paste these lines into your CSS section. The preferred place to add CSS code is right in front of the closing b:skin tag

Next, copy the scripts source code below and paste between the closing b:skin tag and the closing head tag.
<script src=' http://onlinebiztutorials.googlepages.com/jquery-1.2.2.pack.js' type='text/javascript'/>
<script src='http://onlinebiztutorials.googlepages.com/featuredcontentglider.js' type='text/javascript'/>


Then, search for these lines. (You can use CTRL F to search for words)
<div id='main-wrapper'>
<b:section class='main' id='main' showaddelement='yes'>

(Note - As for the shadowelement, it might not matter very much if its a yes or no)

Place this code immediately after it.
<b:widget id='Text99' locked='false' title='Featured Articles' type='Text'>
<b:includable id='main'>
<b:if cond='data:blog.url == data:blog.homepageUrl'>
<!-- only display title if it's non-empty -->
<b:if cond='data:title != &quot;&quot;'>
<h2 class='title'><data:title/></h2>
</b:if>

<div class='widget-content'>
<data:content/>
</div>

</b:if>
</b:includable>
</b:widget>


Scroll down to the bottom and paste this code before the closing body tag.
<script type='text/javascript'>

featuredcontentglider.init({
gliderid: &quot;canadaprovinces&quot;, //ID of main glider container
contentclass: &quot;glidecontent&quot;, //Shared CSS class name of each glider content
togglerid: &quot;p-select&quot;, //ID of toggler container
remotecontent: &quot;&quot;, //Get gliding contents from external file on server? &quot;filename&quot; or &quot;&quot; to disable
selected: 0, //Default selected content index (0=1st)
persiststate: true, //Remember last content shown within browser session (true/false)?
speed: 500, //Glide animation duration (in milliseconds)
direction: &quot;downup&quot;, //set direction of glide: &quot;updown&quot;, &quot;downup&quot;, &quot;leftright&quot;, or &quot;rightleft&quot;
autorotate: false, //Auto rotate contents (true/false)?
autorotateconfig: [3000, 1] //if auto rotate enabled, set [milliseconds_btw_rotations, cycles_before_stopping]
})

</script>


Save the template. Then, click Page Elements. You will see that you just created a new page element with the title "Featured Articles". Add these lines into it.
<div id="canadaprovinces" class="glidecontentwrapper">

<div class="glidecontent">
<img src="http://i11.tinypic.com/8efzmmf.jpg" style="float: left; padding: 5px" />
British Columbia is the westernmost of Canada's provinces and is famed for its natural beauty. It's capital is Victoria, located at the southeastern tip of Vancouver Island. BC's most populous city is Vancouver, located in southwest corner of the BC mainland called the Lower Mainland.
</div>

<div class="glidecontent">
<img src="http://i15.tinypic.com/72vilba.jpg" style="float: right; padding: 5px"/>
Ontario is a province located in the central part of Canada, the largest by population and second largest, after Quebec in total area. Toronto, the capital of Ontario, is the centre of Canada's financial services and banking industry.
</div>

<div class="glidecontent">
<img src="http://i17.tinypic.com/8bg0lkx.jpg" style="float: left; padding: 5px"/>
Yukon, still commonly referred to as "The Yukon Territory", is the westernmost of Canada's three northern territories. The Yukon's major appeal is its nearly pristine nature. Tourism relies heavily on this and there are many organised outfitters and guides available to hunters and anglers and nature lovers of all sorts.
</div>

</div>

<div id="p-select" class="glidecontenttoggler">
<a href="#" class="prev">Prev</a>
<a href="#" class="toc">Page 1</a> <a href="#" class="toc">Page 2</a> <a href="#" class="toc">Page 3</a>
<a href="#" class="next">Next</a>
</div>

(The above is an example. Please change to your own words/images)

A main DIV (ie: "canadaprovinces") should surround all of the individual articles to be featured, with each featured article also wrapped in a DIV of its own and tied together with its peers using a shared CSS class name (ie: "glidecontent").

The script should be fairly easy to use, however if you find any problem while use it, please drop a line in the comments below or contact, and I try my best to support you. If you like it and used it, please do leave a comment with a link to your site, it would be good to know that other people have found it useful. :wink:

Read more...

Slideshow Into Your Blog Post

This script takes list of images and creates a smooth scrolling photo gallery into your blog post i.e instantly create an image gallery by writing just few lines of HTML. It will also create pagination to allow you to flow through your photos.

This tutorial will help you quickly install and configure the script on your blog. Before we move on, I should highlight that all the images within a single gallery must have the same width/height ( 370x250 in pixels). But if you can't live without declaring your images size, this script will use your declared dimensions.

Login to your Dashboard> Layout> Edit Html. Check the Expand Widget Template check box. Copy here and paste these lines into your CSS section. The preferred place to add CSS code is right in front of the closing b:skin tag

Next, copy the script source code below and paste between the closing b:skin tag and the closing head tag.
<script type="text/javascript" src="http://onlinebiztutorials.googlepages.com/contentslider.js"></script>
Scroll down to your closing Body tag, place this script immediately before it.

<script type="text/javascript">

featuredcontentslider.init({
id: "slider2", //id of main slider DIV
contentsource: ["inline", ""], //Valid values: ["inline", ""] or ["ajax", "path_to_file"]
toc: "markup", //Valid values: "#increment", "markup", ["label1", "label2", etc]
nextprev: ["Previous", "Next"], //labels for "prev" and "next" links. Set to "" to hide.
revealtype: "click", //Behavior of pagination links to reveal the slides: "click" or "mouseover"
enablefade: [true, 0.2], //[true/false, fadedegree]
autorotate: [false, 3000], //[true/false, pausetime]
onChange: function(previndex, curindex){ //event handler fired whenever script changes slide
//previndex holds index of last slide viewed b4 current (1=1st slide, 2nd=2nd etc)
//curindex holds index of currently shown slide (1=1st slide, 2nd=2nd etc)
}
})

</script>

Save the template. Then, click on "Posting". Add these lines into your post editor.
<div id="slider2" class="sliderwrapper">

<div class="contentdiv">
<img src="http://i34.servimg.com/u/f34/11/94/91/73/pic110.jpg"/>
</div>

<div class="contentdiv">
<img src="http://i34.servimg.com/u/f34/11/94/91/73/pic213.jpg"/>
</div>

<div class="contentdiv">
<img src="http://i34.servimg.com/u/f34/11/94/91/73/pic310.jpg"/>
</div>
</div>
<div id="paginate-slider2" class="pagination">
<a href="#" class="toc">Page 1</a> <a href="#" class="toc anotherclass">Page 2</a> <a href="#" class="toc">Page 3</a> <a href="#" class="prev" style="margin-left: 10px"><</a> <a href="#" class="next">></a>
</div>

Publish your post and you're done!
(Note - Change the image urls to yours. Add another Div tag if you want to add more photos but you also need to add this code <a href="#" class="toc">Page 4</a> into the pagination script.)

Read more...

Image Gallery Into Your Blog Post

image gallery
If you'd like to showcase your image galleries in a slightly different way from what most lightbox scripts do, FrogJS Image Gallery is the answer. You view the images in sequence, by clicking on the previous and next images' thumbnail. Thumbnails are placed at the left and right edges of the FrogJS DIV and the main image is centered within that DIV. For this example, I've defined 3 images, the three thumbnails are 125px wide and the main image is 400px wide, my FrogJS DIV’s width to at least 700px

Here's a step by step guide to installing the script. Login to your Dashboard> Layout> Edit Html. Copy and paste these lines into your CSS section. The preferred place to add CSS code is right in front of the closing b:skin tag

#FrogJS{
width: 700px;
height: 600px;
margin: 0 auto;
}
#FrogJSCredit{
text-align: right;
font-size: 80%;
color: #999;
padding: 1px;
}
#FrogJSCaption{
text-align: left;
line-height: 140%;
}

Next, copy the scripts source code below and paste between the closing b:skin tag and the closing head tag.
<script type="text/javascript" src="http://onlinebiztutorials.googlepages.com/prototype.js"></script>
<script type="text/javascript" src="http://onlinebiztutorials.googlepages.com/scriptaculous.js?load=effects"></script>
<script type="text/javascript" src="http://onlinebiztutorials.googlepages.com/frog.js"></script>


Save the template. Then, click Settings> Formatting> Post Template. Add these lines into the post template box.

<div id="FrogJS">

<a href="images/1.jpg" title="Your Image Title">
<img src="images/1_thumb.jpg" alt="Your Image Description" />
</a>

<a href="images/2.jpg" title="Your Image Title">
<img src="images/2_thumb.jpg" alt="Your Image Description" />
</a>

<a href="images/3.jpg" title="Your Image Title">
<img src="images/3_thumb.jpg" alt="Your Image Description" />
</a>

</div>

Example:-


Save settings. You'll notice that anything you type into the box of "Post Template" will appear in your new post. (Note - All your images must go inside the DIV tag. Just add another DIV tag if you want to increase the number of images.)

Read more...

Displaying Your Flickr Photos


(Click to view full size image)

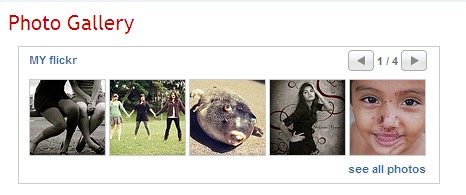
Flickr is the best online photo management to share your family photos with friends and relatives. As for the amateur photographers, they can show off their work in gaining recognition for their photos.Written word will continue to be the basis of telling a story, but pictures will enhance that story. Some people have had quoted this as a Chinese Proverb - "One picture is worth ten thousand words" but we do know that the phrase is American in origin - "A picture is worth a thousand words". Anyhow, both have the same meaning.

This tutorial will guide you through the steps. Login to your Dashboard> Layout> Edit Html. Copy here and paste these lines into your CSS section. The preferred place to add CSS code is right in front of the closing b:skin tag

Save the template. Next, click a button below to easily add the script into your page element.


You click the link and view the code details. Change the flickr id to yours as shown below:-
flickr id

After you make such an amendment, just click the "Add widget" button to complete the entry. Then, click and drag to rearrange the said page element on your blog. The suitable place is above your blog post unless your sidebar's width is more than 410px in order to accomodate all your five thumbnails in a row.

To find your flickr id, simply click the RSS feed at the bottom of your stream as shown below:-
flickr idScript courtesy of Christian Heilmann
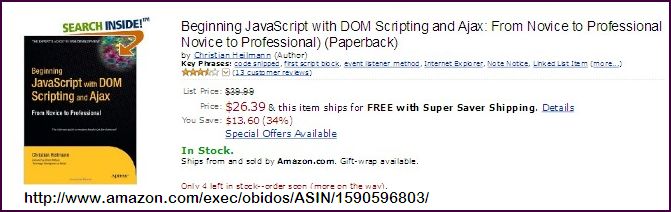
He is the author of Beginning JavaScript with DOM Scripting and Ajax, and he contributed a chapter on accessible JavaScript to Web Accessibility—Web Standards and Regulatory Compliance. He is a lead developer at Yahoo! in England.

Read more...

Creating a Facebook Style Lightbox


Facebox is a lightweight Facebook-style lightbox. It's a jQuery-based and can display images, divs, or entire remote pages (via Ajax) inline on the page and on demand, unlike Lightbox v2.0, which uses Prototype. The downside of using Prototype is, if you have two or more scripts that EACH contain either body ONLOAD or window.onload, you'll have a conflict on your hand. We called it - Script Conflict. But with jQuery, it simplifies the amount of code you write for a routine task.

To open an instance of Facebox, all I do is create a hyperlink tag (similar to my previous tutorial on Lightbox). When I click this link, Facebox pops up with an image displayed in the center of the container, nicely and neatly packed inside.

This article is intended as a quick tutorial on using Facebox. It's certainly enough to get you started, and the features presented here may be all you ever need to know about Facebox. Login to your Dashboard> Layout> Edit Html. Copy the scripts source code below and paste between the closing b:skin tag and the closing head tag.


<script src="http://onlinebiztutorials.googlepages.com/jquery-1.2.2.pack.js" type="text/javascript"></script>
<link href="http://onlinebiztutorials.googlepages.com/facebox.css" media="screen" rel="stylesheet" type="text/css" />
<script src="http://onlinebiztutorials.googlepages.com/facebox.js" type="text/javascript"></script>

<script type="text/javascript">
jQuery(document).ready(function($) {
$('a[rel*=facebox]').facebox()
})
</script>


Save the template. Then, click Settings> Formatting> Post Template. Add this line into the post template box.
<a href="image.jpg" rel="facebox">link image 1</a>
Example:

Save settings. You'll notice that anything you type into the box of "Post Template" will appear in your new post. Change the color in red to fit your needs. Repeat your previous action in Post Editor should you want to create more hyperlinks.

Read more...

Thumbnail Album with Lightbox Effects

In my previous article, we have learned how to create hyperlinks that point to images using lightbox effects as it allows you to load larger versions of images on the same page via a cool overlay window. The rest of the page is dimmed with a grayish transparency. Today, we will learn how to create a thumbnail album with lightbox effects as shown below.


If I click the first thumbnail in the blog post, it will then be displayed in the center of the window, as shown below:-

Login to your Dashboard> Layout> Edit Html. Copy here and paste these lines into your CSS section. The preferred place to add CSS code is right in front of the closing b:skin tag


Next, you need to copy the scripts source code below and paste between the closing b:skin tag and the closing head tag.
<script src='http://onlinebiztutorials.googlepages.com/prototype.js' type='text/javascript'/>
<script src='http://onlinebiztutorials.googlepages.com/scriptaculous.js?load=effects' type='text/javascript'/>
<script src='http://onlinebiztutorials.googlepages.com/lightbox.js' type='text/javascript'/>

Save the template. (Note - If you have already installed the CSS code and the three scripts before, please skip ahead to post template.)

Click Settings> Formatting> Post Template. Add these lines into the post template box.
<TABLE><tbody><TR><TD><a href="images/image-1.jpg" rel="lightbox" title="my caption1"><img src="thumbnail1.jpg"/></a></TD><TD><a href="images/image-2.jpg" rel="lightbox" title="my caption2"><img src="thumbnail2.jpg"/></a></TD><TD><a href="images/image-3.jpg" rel="lightbox" title="my caption3"><img src="thumbnail3.jpg"/></a></TD><TD><a href="images/image-4.jpg" rel="lightbox" title="my caption4"><img src="thumbnail4.jpg"/></a></TD></TR></tbody></TABLE>
Example

Save settings. You'll notice that anything you type into the box of "Post Template" will appear in your new post. Change the color in red to suit your own preference before you publish your new post eg. your image reference url, your caption (text to be displayed) and your thumbnail image url. (Note - your total thumbnail album's width must not exceed your post container's width.)

Read more...

Creating Hyperlink with Lightbox Effects

This technique is a combination of Dynamic HTML (DHTML), and Asynchronous JavaScript™ + XML (Ajax) to throw content right at users' eye level so that it really grabs their attention. In the case of the example below, I have a link on the page, and when users click it, they're shown a larger version in a "lightbox."

When I navigate to the page, I see just a link:-


But when I click it, I see a full-sized image elegantly displayed in the center of the window, as shown below:-


Disclaimer: The lady on the picture has nothing to do with my site, the pic is stolen from Entrecard. Hope she doesn't mind. Any violent objections, don't hesitate to leave comments - Cheers -

All the material in the background is grayed out, so that your eye is further drawn to the content in the center of the display. Also, the wonderful part is, you too can display some additional text to users! Interested? Just follow the following instructions.

Login to your Dashboard> Layout> Edit Html. Copy here and paste these lines into your CSS section. The preferred place to add CSS code is right in front of the closing b:skin tag


Next, you need to copy the scripts source code below and paste between the closing b:skin tag and the closing head tag.

<script src='http://onlinebiztutorials.googlepages.com/prototype.js' type='text/javascript'/>
<script src='http://onlinebiztutorials.googlepages.com/scriptaculous.js?load=effects' type='text/javascript'/>
<script src='http://onlinebiztutorials.googlepages.com/lightbox.js' type='text/javascript'/>


Save the template. Back to Settings> Formatting> Post Template. Add this line into the post template box.
<a href="images/image-1.jpg" rel="lightbox" title="my caption">Link 1</a>
Example

Example
I have been trying to email <a href="http://entrecard.s3.amazonaws.com/eimage/23062.jpg" rel="lightbox" title="my gal">you</a> for several days now. I live right down the street. Im very interested in your stuff. please call me at xxx-xxxxxxxx


Save settings and publish the post if you'd like to use the above example. (Note - Change the color in red to suit your own preference eg. your image url, your caption (text to be displayed) and your link text. No limits to the number of image sets per page, how many images are allowed in each set or how many links are permitted as long as you specify like the above example in your post editor. Just copy and paste your first text link example and add as your second text link. If you don't have any link to be displayed, please remove/delete before you publish your post.)

As you can see, this is a great way to provide additional material on products or articles listed on the page without moving users away from the page. Leave me comments should you require my assistance. Enjoy!

Read more...

Creating a Lightbox Gallery

I received a question on how to create a lightbox gallery, so I decided to post step-by-step instructions. Before that, let me explain what's a lightbox gallery? A lightbox gallery is a group of pictures uploaded that acts as a slide show when activated. It's a useful tool for photographers/Etsy members who use a lot of images to potray their photos/products. That's why I frequently visit their sites as I've a great respect for them. They're so talented and gifted!!!


Finally, a lightbox gallery is a great solution. It will do the following:-
a- Visually attractive
b- Working inside a frame
c- Easy to organize photos/images and share them with others.

Login to your Dashboard> Layout> Edit Html. Check the Widget Expand Template check box. Copy and paste these lines into your CSS section. The preferred place to add CSS code is right in front of the closing b:skin tag

#myGallery{
width: 200px !important;
height: 100px !important;
overflow: hidden;
}


Then, you need to copy the scripts source code below and paste between the closing b:skin tag and the closing head tag.
<script src='http://x5x5x1xx.googlepages.com/mootools.v1.11.js' type='text/javascript'/>
<script src='http://x5x5x1xx.googlepages.com/jd.gallery.js' type='text/javascript'/>
<link href='http://x5x5x1xx.googlepages.com/jd.gallery.css' media='screen' rel='stylesheet' type='text/css'/>
<script type='text/javascript'>
function startGallery() {
var myGallery = new gallery($('myGallery'), {
timed: true,
showArrows: false,
showCarousel: false
});
}
window.addEvent('domready', startGallery);
</script>


Here comes the tricky part. You need to specify the div properties in your template. Failure to do so, no image will be displayed. For this example, let say we place the code in the sidebar. Copy and paste the following code.
<div id="myGallery">
<div class="imageElement">
<a class="open" href="POST LINK"></a>
<img src="YOUR IMAGE DATA URL" class="full"/> <h3>YOUR IMAGE TITLE</h3>
<p>YOUR IMAGE DESCRIPTION </p>
</div>
</div>


Note - If you would like to add more images, copy and paste the above code repeatedly.

Read more...